
 "Pin It")

Power Query is a powerful and intriguing tool. However, there are stumbling blocks that make it challenging. Let’s audit and then modify some M code!
Auditing & Modifying M code
The steps we create in Power Query are translated into M code (Power Query language). Understanding it and modifying it requires practice!
In this post XLarium shared an alternative solution (thanks!) to create a Cartesian product (all text combinations between multiple lists). Let’s start by auditing his solution.
Auditing XLarium’s code
First step is the same: load all 3 tables into power query. But he solves it with only 1 query (I used 2). Click ‘Advanced Editor’ to see his M code:
let
Source = Colors,
#”Removed Columns” = Table.RemoveColumns(Source,{“Dummy”}),
#”Added Custom” = Table.AddColumn(#”Removed Columns”, “Temp”, each Sizes),
#”Expanded {0}” = Table.ExpandTableColumn(#”Added Custom”, “Temp”, {“Size”}, {“Size”}),
#”Added Custom1″ = Table.AddColumn(#”Expanded {0}”, “Temp”, each Animals),
#”Expanded {0}1″ = Table.ExpandTableColumn(#”Added Custom1″, “Temp”, {“Animal”}, {“Animal”})
in
#”Expanded {0}1″
Let’s review it row by row
Source = Colors,
He references the Colors query (the loaded table).
#”Removed Columns” = Table.RemoveColumns(Source,{“Dummy”}),
His approach doesn’t need a Dummy column so he removes it.
#”Added Custom” = Table.AddColumn(#”Removed Columns”, “Temp”, each Sizes),
The current step refers to the previous step hence: #”Removed Columns”.
Table.AddColumn is obvious but the end part “Temp”, each Sizes puzzled me. So I closed the Advanced Editor and examined ‘Added Custom’ under APPLIED STEPS.

I clicked the gear icon for step ‘Added Custom’.
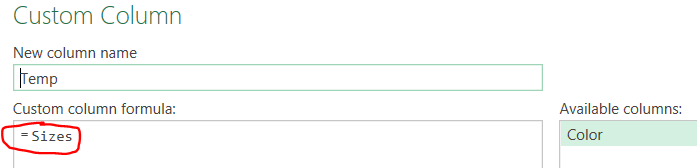
Even-though ‘Color’ is the only available column he uses =Sizes to reference query Sizes!
The result is this:
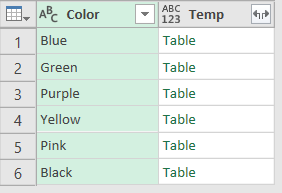
What is this?
Each row in field ‘Color’ gets the entire ‘Sizes’ query (‘Table’) !!
Row 1 (‘Blue’) gets each row from query ‘Sizes’. Repeat for each row.
#”Expanded {0}” = Table.ExpandTableColumn(#”Added Custom”, “Temp”, {“Size”}, {“Size”}),
This long code simply means the double arrow button (right of ‘Temp’) was clicked!
Result of expanding field ‘Temp’ is all combinations of ‘Colors’ & ‘Sizes’ (24 total rows) !
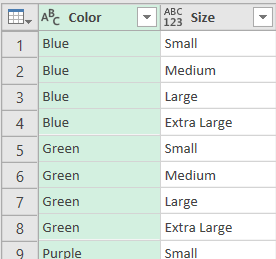
Here we see a sample.
6 colors X 4 sizes = 24 total rows
#”Added Custom1″ = Table.AddColumn(#”Expanded {0}”, “Temp”, each Animals),
Once again XLARIUM uses “Temp” field to create multiple rows for each single row!
#”Expanded {0}1″ = Table.ExpandTableColumn(#”Added Custom1″, “Temp”, {“Animal”}, {“Animal”})
And expanding this gives us the final result of 72 rows!!!

Modifying XLarium’s code
Why would I modify his M code?
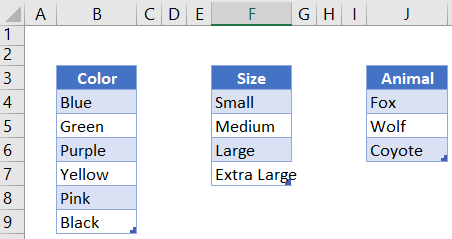
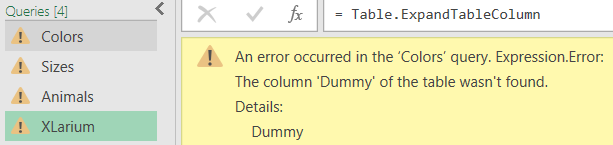
His solution doesn’t use Dummy columns so I removed them in the original data (sheet ‘Inputs’).
After a refresh Power Query realizes dummy columns don’t exist. The code doesn’t work.
Below we see the original M code. I’m going to modify it 🙂 !
let
Source = Colors,
#”Removed Columns” = Table.RemoveColumns(Source,{“Dummy”}),
#”Added Custom” = Table.AddColumn(#”Removed Columns”, “Temp”, each Sizes),
#”Expanded {0}” = Table.ExpandTableColumn(#”Added Custom”, “Temp”, {“Size”}, {“Size”}),
#”Added Custom1″ = Table.AddColumn(#”Expanded {0}”, “Temp”, each Animals),
#”Expanded {0}1″ = Table.ExpandTableColumn(#”Added Custom1″, “Temp”, {“Animal”}, {“Animal”})
in
#”Expanded {0}1″
#”Removed Columns” = Table.RemoveColumns(Source,{“Dummy”}),
We remove this row of M code. We longer have Dummy columns in our source data.
#”Added Custom” = Table.AddColumn(#”Removed Columns”, “Temp”, each Sizes),
See the problem above? Step #”Added Custom” refers to previous step #”Removed Columns” that we removed. No problem, we change #”Removed Columns” to Source (query ‘Colors’).
Now we have this shorter code version of XLarium’s M code:
let
Source = Colors,
#”Added Custom” = Table.AddColumn(Source, “Temp”, each Sizes),
#”Expanded {0}” = Table.ExpandTableColumn(#”Added Custom”, “Temp”, {“Size”}, {“Size”}),
#”Added Custom1″ = Table.AddColumn(#”Expanded {0}”, “Temp”, each Animals),
#”Expanded {0}1″ = Table.ExpandTableColumn(#”Added Custom1″, “Temp”, {“Animal”}, {“Animal”})
in
#”Expanded {0}1″
I now fully understand XLARIUM’s “Temp” column concept to create a Cartesian product! Thanks XLARIUM!
About Me

My name is Kevin Lehrbass. I’m a Data Analyst. I live in Markham Ontario Canada.
I have 2 dogs. This is Cali 🙂 She was upset that I was working on this post (on the weekend).
Don’t worry…I spent time with her and Fenton. It’s been hot lately and Cali loves sunning on the deck in the backyard. Fenton loves running in circles.